
Documentation & Software Download 🤖
Your License Key will be sent to your email or where you communicated when you purchased one of the pricing plans (check your SPAM folder in any case). You will need to use it to activate the software alongside your email address. Please allow up to a few hours to receive it. In the meantime, please download the software and read the documentation.
You can go ahead and download the files from here: Download the software by clicking here.
Click on the link, then click on the small arrow in the right side (download) and click on “Or continue to download only” and download the files. Your laptop should be good enough. Here are the requirements for the bot, especially if you are using a VPS:
– 1 GB of storage
– 2 GB of RAM
– CPU above an Intel Pentium 4
– Windows 7, macOS 10.10 or any recent Linux (Debian 8, Ubuntu 12.04), with 64-bit
– and obviously an Instagram account.
Go ahead and click on the download link above to download the software. The license key will be sent to you and you need to activate it in the software to begin using the actions.
Sometimes certain anti-viruses see the file as a virus by mistake since it’s self-signed. Make sure to allow your computer to download and execute the file. The file is safe for your computer. Be sure to disable and whitelist the software, as sometimes some ant-viruses will mark the software as a virus by mistake.
Virus Total Link: Here is the virus total link scan of the URL.
Virus Total Software: Here is the virus total link scan of the download file.
Once you downloaded, unzip it using a program such as winrar and open MaxPlus Bot. After that, you can put your License key and email address to activate your license. Make sure to read all the guidelines before hand. You can follow the guide below.
Before Using VPS / VPN / Proxy
Firstly we reccomend only that you use this with your main PC or maybe a spare laptop. If you need to use a VPS then please be SURE that if you are going to use a VPS / VPN that you have good proxies, otherwise it won’t work because Instagram detects bad VPS / VPN. It’s not good to use a VPS if you do not have a good proxy/vpn. VPS servers use data center IPS, well known from Instagram and they will instantly block access to the website.
If you are buying a proxy, you need it as a static residential or static mobile. Before you buy a proxy you need to SPECIFICALLY TELL THE PROXY PROVIDER THAT YOU NEED TO USE THE PROXY FOR INSTAGRAM. Once you have the proxy – Be sure to use the “PROXY CHECKER” that comes into the software bot. Just go to the “PROXY CHECKER” tab and check your proxy. Click on Check and then Browse. Go to Instagram.com and see if the web page works. If it does, double check your IP that it’s the same IP from your proxy. You can go to google and type “my ip” or check on the website such as https://whatismyipaddress.com.
How To Add A Proxy:
To add a proxy, all you have to do is go to the “Accounts” tab in the software and click under “Proxy”. Make sure to add your account first, and then put the details there. If you want to make sure your proxy is working and want to get ready logged in, click on the “Browse”. If the page is blank and there will be an error on the program, that means your proxy is not good and you will need a better one.
You can try these proxies: https://brightdata.com/proxy or https://iproyal.com/pricing/residential-proxies/
For VPS if they give you the option for static residential IP then it’s good. Otherwise you need a proxy to run it. If you are purchasing proxies – make sure they are static residential or static mobile. You will also need 1GB+ of free ram on the VPS per IG account that is running. DO NOT run the bot with a VPS without a proxy if it’s not static IP.
Our recommendation is always that you use a spare laptop or desktop.
Installation & Update
Be sure that you have the latest version, check the CHANGELOG and download the last files (from this page here that you are on). If the files are in an archive file (ZIP file), extract all the files then, depending on your operating system, follow the instructions:
Windows:
Once unzipped – Open the file called “MaxPlus Bot.exe” and follow the instructions. You might have to allow your computer to run unsigned/untrusted apps (check your settings on Windows Defender or Windows Security). To update the application, you simple have to install the new version with the exact same steps, it will override the current installation while keeping your existing user data.
If you are using any Antivirus or Firewall (Windows Defender, Windows Security…), be sure to allow the software to write files and access to internet, temporary allow your operating system to install unsigned/untrusted apps.
Our software is self-signed, because “trusted” code signing certificates are a scam controlled by some centralized companies, and unlike SSL certificate, you cannot get a “trusted” certificate without paying a huge fee. Also, anyone who buys their certificate will be automatically “trusted”, so it doesn’t make the software safer. They are selling the certificates for hundreds of dollars per year, even if it costs literally nothing to create one, they are just ripping off developers.
First, you have to activate your license in the software, click on “License” section, then enter your License Key and your Email then click on Validate. Then read the Guidelines section, it contains all the information you need to grow your Instagram audience and use the software safely.
I highly suggest you check out the tutorial video here or below on how to activate license and how you can start the basic follow followers of accounts. This will help you have an idea on the software.
On some operating systems, minimizing the software can pause the bot, so do not minimize it but you can keep it running in the background. Also if you close the software, it will stop the bot.
The software will open a web browser window and perform actions on it, do not touch it, do not hover it, do not close it and do not minimize it, but you can keep it running in the background. You only can move it by dragging the title bar at the top of the window (not on the web page), it is recommended to let the web page content visible.
If the Bot detects you have been temporarily blocked, it will sleep for a few hours before the next action.
Starting with MaxPlus Bot (Important)
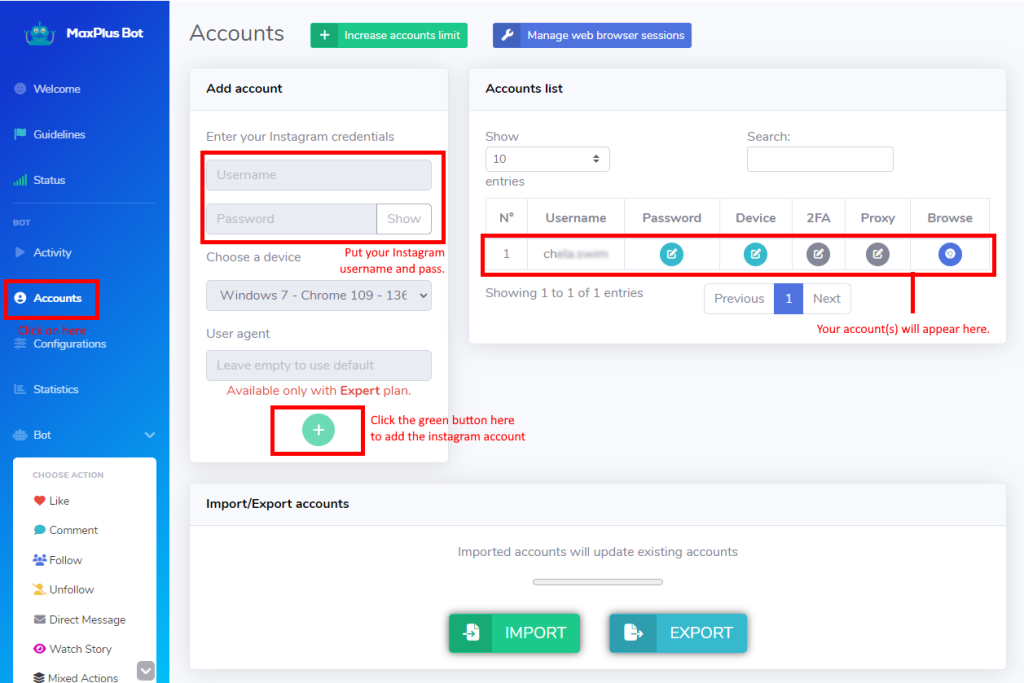
Once you installed MaxPlus Bot – you have to put the license key and email address to activate your copy. Go to “License” under software and add the details there. Once that is done, you can start adding your Instagram accounts.
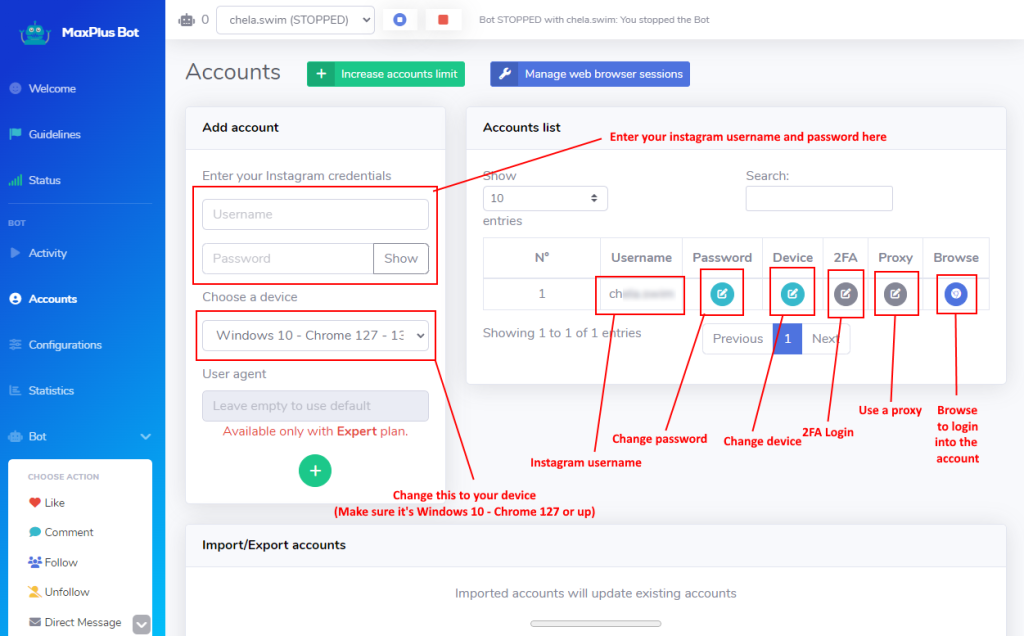
To do this, click on “Accounts” and put your instagram Username and Password. You can select the device that you wish to use – it’s best to select WINDOWS 10 – CHROME 109. Be sure to check them out sometimes Instagram gives issues logging in on different devices – so if you can’t login just change the device. After that click on the green + button to add your account. You can see your account will be listed on the right side.
If the bot have issues logging into your account or wrong password – Try to login individually with chrome and see if it works. Sometimes, logging into Instagram accounts on desktop/chrome gives an error that you can’t login. If it not working fine, select a different device in ACCOUNTS > Choose a Device (Change Windows 7 – Chrome 109 to Windows 10 or something else for example) and check again.
The CONFIGURATIONS are only optional. If you want to get straight to actions – then skip this step and move on to the section below for follows, likes, un-follows, etc. as this step will explain about configurations only.
Configurations: Once you added your account, you need to set your configurations which can be found under Accounts. Click on “Configurations” and there you can see a list of things. Firstly, you can set a new configuration by clicking NEW. These are for account limits and can be loaded quickly when you start doing an action. You can set an action limit such as Like, Comment, Follow, Unfollow, Direct Message and Watch Story.
To create a new Configuration, all you have to do is click on NEW and make a name under “Enter a configuration name“. Then, set the actions limits. These are the limits on what the bot will do. You can also see the sleep times, filters and options on the left sidebar.
Basic Sleep Times: You can enable this or disable it. If you enable it, you can set the sleep time. This will mean the bot will sleep from 23:00pm till 8:00am to act like a real human and then will complete the actions after this time. You can disable this if you want.
Customized Sleep Times: These are the customized Sleep Times but for each actions. That means you can set the sleep time on Likes, Follows, DMs etc.
Filters: You can apply filters for the followers and actions you do. The filters will be applied on each account you interact with. By example, if you are targeting the Followers of the account named “natgeo” – the filters will be applied on each Follower. You can set that the followers needs to have at least 5 posts, 200 followers or are following at least 500 people (for example) to interact with them. You can also set if an account is verified or not, or if it’s a personal or business account.

Also below you have these settings as well which we will explain:
HashTags (0): Here you can add a hashtag to target specific hashtags for the actions. Add a hashtag and click on + to add it.
Location ID (0): Here you can add a location ID to target specific locations for the actions. Add a hashtag and click on + to add it.
Usernames (0): Here you can add a username to target for the actions. Add a username (like “Swim” for example) and click on + to add it.
Comments (0): Here you can add comments with Spintax integration so they will be different each time. Add a comment that you like and click on + to add it. You can also read more about Spintax here and how it works.
Here is an example of the Spintax Integration. If for example you type something like this:
{Hey|Hello|Hi}, {nice post|great content|awesome pic}! Keep up the {good work|amazing job|fantastic efforts}!
In the example above, The bot will randomly select one option from each set of curly braces to create a unique comment or message. This way, you can generate multiple variations of your text without manually writing each one. Some examples of messages generated with the previous syntax:
Hey, awesome pic! Keep up the amazing job!
Hello, awesome pic! Keep up the good work!
Hi, nice post! Keep up the fantastic efforts!
Direct Message (0): Here you can add direct message with Spintax integration so they will be different each time. Add a message that you like and click on + to add it. Same as Comments, but instead as a DM.
Whitelist Username (0): Here you can whitelist a username of your choice so it won’t do any actions on it (like follow, unfollow etc). Add a username that you like and click on + to add it.
Once you are ready with your CONFIG all you have to do is click on SAVE. This will save your config, and you can quickly load it. All you have to do is select the config you want to load when you do an action under “Select configuration” and load it there. You can also use the default and set your own each time.
Once that is done, you can start the bot! Let’s use an example. Go to “Follow” in the software tab and click on “Follow Followers“. This will follow the followers of an account. Click on GO. Let’s say we target this account here called: swim. Select your account. Now, set your configs (or load the one you did before) and once you are done click on the START button. That’s basically it! It will open 2 tabs, and just leave it running and it will do all the work.
You can either start with likes, follows, comments, DMs or mixed actions (so it will do a little bit of everything). To start an action, click on one of the found actions such as Likes, Comment, Follows, Unfollow, Direct Message, Watch Story, Mixed Actions or Special. Once you selected what you want to do, all you have to do is select the one that you want to start with and click on GO. After that, you can either select your own configuration that you done or the default one. You can remove the Basic Sleep Times if you want it to run 24/7 and also select the account you want to follow the followers from. Make sure to select your account as well- and then click on the blue button called “START” and it should start the process by opening 2 tabs. Be sure not to interfere with them and let the bot do it’s work!
Starting Your First Action (Important)
Once you have added your instagram account you can instantly start your action. Before that, make sure your account is working. If you want to check if your account is really working, all you have to do is go to the “Accounts” tab and click on the BROWSE to make sure your account login fine.
For this example; we will start an action to “Follow All Followers” of an account. To do this, click on “FOLLOW” on the left side. Then, you will be presented with different type of follow actions. You can pick any you like, but for this example let’s click on “Follow Followers“. Press on “GO“.
Now all you have to do is select your instagram account that you want to use, Select configuration if you want to use any (or leave it at default), the action limits, filters (if you need any) and add a username.
Select Instagram account: Select your Instagram account.
Select configuration: If you done any configurations, you can use them or just leave it at default.
Actions Limits: This is the limit of the action, so if you select 50 – then it will follow 50 people and stop.
Usernames (0): You can add usernames here to follow the followers of this username.
Whitelist (Usernames): This is only used if you want to whitelist a username so you don’t do any actions on it.
Basic Sleep Time: You can set a sleep time, for example from 00:00 till 03:00 and the bot will stop and sleep from 00:00am – 03:00 and not perform any action, like a real human.
Customized Sleep Time: These are the sleep times but can be customized, for example you can set the waiting and sleep time after each action is made (after every follow etc.)
Filters: You can use filters to filter accounts by business, creators, followers, how many posts they have etc.
Once you are ready, all you have to do is press “START“. Once the bot starts – it will open 2 web browsers. The software will open a web browser window and perform actions on it, do not touch it, do not hover it, do not close it and do not minimize it, but you can keep it running in the background. On some operating systems, minimizing the software can pause the bot, so do not minimize it but you can keep it running in the background. Also if you close the software, it will stop the bot. You only can move it by dragging the title bar at the top of the window (not on the web page), it is recommended to let the web page content visible.
Read The Guidelines! (Important)
When you opened the software, you should notice the GUIDELINES. These are to be READ. Please do not evade reading the guidelines as these are important. The bot mimics human behavior, and it’s not a spam bot. It is made so you can sleep and it will grow your account organically for you – but you have to follow them. Here are a few:
If you are using a new proxy – Instagram detects you. That means, do NOT go over the limit. If you are using a new proxy, then instagram is already suspicious. That means, you need to not go over the limit. Don’t go following 5000 people at once. Start small, and increase day by day. Otherwise Instagram can get suspicious over this.
Do not use a EMPTY account – Instagram may catch on to this. If you use a empty account to mass-DM and such, then this can be caught quickly. Please use a bit of an “established” account. At least with a little following, posts and followers so it don’t seem like an spam account.
Do not unfollow accounts less than one week after you followed them. You should keep the followed accounts for a few weeks before unfollowing them. We also recommend you to whitelist the accounts that interact often with your posts, you should keep them in your Followers/Following.
If your account is less than 1 month active DO NOT to follow more than 50 accounts per day during the first weeks, wait to have more followers then increase slowly every week. You can always start small and move on. Rome wasn’t build in a day.
There is a big list of guidelines and these are just a few, and even instagram guidelines that helps you stay safe with the bot. Please take some time to read them, so you won’t have any issues with the software.
For the very first time, I recommend that you start slow and work your way up. Something like this for the first week should be good enough and then slowly increase per week:
Follows: 200
Likes: 50
Un-follow: 50
Comment: 5
If you are going to use DM, only go with around: 20 per day as a start.
You can slowly start to increase it. I would leave the DM for the last resort once your account is warmed up a bit. Also, you can do single actions for the first few days. That means only following people, only likes etc.
Troubleshooting
Most of the errors are clearly stated in the logs on the Activity section on the software, be sure to respect the Guidelines to avoid any problem.
Please check the Status section at every launch to check the list of known bugs.
Here are some common errors you might get:
The browser is already stopped but I still get some errors: Some actions might have been running when you manually stopped the bot or closed the web browser, so you will get errors saying that those actions failed. The logs show the number of the session, like “myusername[1]”, so you can simply ignore the logs from a closed session.
TimeoutError: Navigation timeout of 30000 ms exceeded: You have a network problem, it is often a problem from your Internet connection (also from your proxy/VPN if you are using one), the timeout error means the data between your machine and Instagram was not received within the time limit allowed. You can increase the timeout value in the Settings section, but some requests have a timeout defined by Instagram and there is nothing you can do about it except getting a faster Internet connection.
The browser has been disconnected (closed or crashed): Your web browser was closed or crashed, it also happens when your computer enters in sleep/inactive mode. Close all the windows and start again.
The bot is not logging into my account and giving me an error or wrong password: This could be because of the web browser. Please make sure that on Chrome, you can actually login into your account. If you can – then go onto “ACCOUNTS” tab in the software and under “Choose a device” select a different browser (such as Windows 10 – Chrome 123 for example) and see if the account logins then.
Error 429: If you have error such as “The Bot could not verify the current logged account, error: Cannot open account page”: This means your proxy or VPS is not connecting to Instagram. This could mean either you are using it without a proxy, you are using a VPS/VPN that instagram is already banned in. It’s best if you can check with the “Proxy Checker”. Use the “Proxy Checker” tool and add the proxy details, then click on “Check”. After that, click on “Browse” and see if the proxy is working. Type in https://whatismyipaddress.com and check if the proxy is connected. If everything is fine, then go to “Accounts” and click on the grey edit box, and add the proxy there. If you are going to use a proxy, be sure it’s a static personal IP / Dedicated. Make sure to say to your proxy provider that you are using this Proxy IP with instagram. It’s best if you can first test it out to see if it opens Instagram with the proxy you bought.
If you have any questions, please don’t hesitate to contact us on email or telegram: @LucaBHW